If you feel better about changing your Class A motorhome’s oil through our self-empowering oil change guide, you’re ready for the next stage. You took a big step in your RV maintenance, and lowered your overall maintenance budget. Using the Camper Smarts Inspection Checklist, you’ll find some other parts that need examination.
Now it’s time to take the next step. Yes, you can maintain other filters and fluids. Even if you still feel shaky about what’s under the hood of your Class A RV, I’ll walk you through the following:
- Identifying the necessary components
- What each filter and fluid looks like
- How to remove, replace, and reinstall the new filter
- Determining if the filter and fluid needs attention
- Streamlining the process so you’re not running back and forth to the store.
If you remember from the oil change article, my father nicknamed me Brian “the hard way” Newman because I didn’t research or prepare correctly. To avoid passing on that moniker to you, I’ve designed this article with helpful tools, so you only have to make one trip to the store (or order everything in a single online purchase).

RV Maintenance Tip on Using This Article
We recommend reading through the entire RV maintenance article first to become familiar with the material. When you perform each maintenance check, have the article up on your mobile device so you can walk through the steps. Keep a small pocket-sized notepad and pen handy to make your notes.
At the end of the article, we’ve created a shopping list you can print out. Use the checkboxes to identify what fluids you need. The filters have lines where you can write down the brand and model number of the current version. You can use the list to keep all the information in one place. In case you missed it above, here’s a link to the Camper Smarts Inspection Checklist. As you continue in the “Yes You Can” motorhome RV maintenance series, feel free to customize your own RV inspection checklist for your specific needs based on everything you learn.
Getting Back Into the RV Maintenance Zone
Do you have your playlist put together? I think a 1980s hair band vibe may do it this time: Motley Crue, Poison (Brett Michaels is an Avid RVer), Def Leppard, and Warrant. Try to keep the headbanging to a minimum; you do need to concentrate. I still have plenty of RV scrubbing toothbrushes for anyone who calls this music “oldies.”
Like any major automotive or RV maintenance task, you’re going to get dirty. When you’re putting your wardrobe together, don’t forget to wear your mud shoes. The clothing you wear may end up with fluid and grease stains, so this may be a great time to get your grunge on. Don’t forget your disposable latex work gloves and protective eyewear. You’ll work carefully with all of these fluids, but there’s always a chance for splattering.
RV Maintenance: Understanding Your Motorhome
For a quick review, after your oil change experience, you now know the name of your RV’s engine, the location of the oil cap, and how to check the oil dipstick. Knowing this is RV maintenance 101. Gassers have either the Ford 6.4L V10 Ford Triton or the new Ford 7.3L V8 Godzilla.
Diesel Class A motorhomes with a Cummins engine use one of the following Inline 6-cylinder Cummins turbo diesel engines:
- 6.7-liter B
- 8.9-liter ISL9
- 11.9-liter X12
- 15-liter X15
Engine Fluids
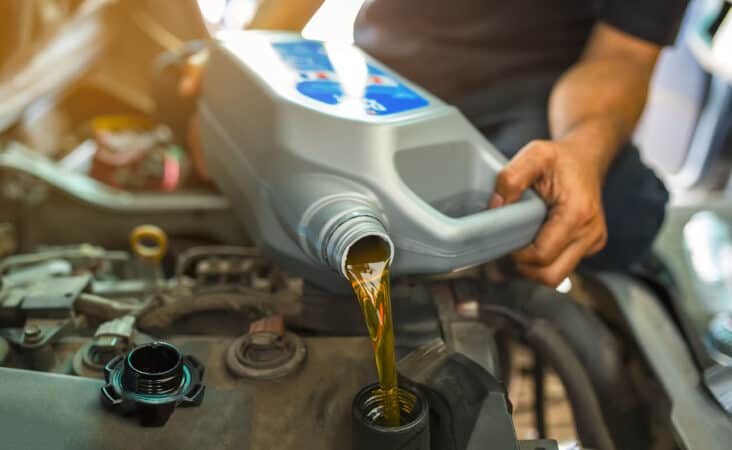
Before we get into the filters, you and I will start with the fluids. Some of these fluids are formulated based on the motor’s brand, but there are multi-brand and multi-purpose versions. The liquids are color coated, making it easier to identify a leak (insert irrational ritual to lift evil luck jinx). Since you already conquered the oil change, now it’s time to top off the rest of the fluids.
There are seven fluids in your car, but Class A motorhomes use six of them. If you toad your passenger vehicle (tow a car), it’s a good idea to keep a bottle of the other two in your hardware bay in case you need it on the road.
- Air Conditioner Coolant- Compressed Gas
- Brake Fluid- Not Needed
- Oil- Dark Yellow or Golden
- Power Steering Fluid- Red
- Radiator Fluid- Green, but often varies depending on manufacturer.
- Transmission Fluid- Transparent or Pink
- Windshield Washer Fluid- Blue, Green, or Orange
Motorhome power leveling jacks use hydraulic oil, but later, we’ll show you a veteran trick that saves money and space in your hardware bay. An RV service center manager taught me the trick, and I haven’t had any problems.
For Class B camper vans and Class C RVs, all of this translates except for the jack fluid. You can follow along, but you’ll need to spend some extra time referring to your owner’s manual to identify where the components are. If you sign up for the Campers Smarts Newsletter, you won’t have to wait too long for a tailor-made article for your motorhome RV maintenance guide.
Air Conditioner Refrigerant
The dashboard air conditioner on your motorhome works differently than your rooftop HVAC units. It uses a gas called freon or a substitute like R134 or R134a to cool the air in the driver’s area. You may find that your dashboard’s A/C isn’t getting as cold as it used to after years of use.
A/C refrigerant cans are about the size of a hair spray bottle. You connect them to the appropriate port with the hose that comes with the can. Spend the extra money and get the A/C recharge kit that comes with the pressure gauge. It ends up cheaper in the long run. If you ever need to recharge your A/C again, you’ll still have the hose and meter, so all you’ll need is the can itself.
You’ll see a dull grey metal pipe piece with a black or bright blue cap on the passenger side under the hood. If you have a diesel pusher motorhome, you’ll find it on the driver’s side of your front generator bay.
Black rubber tubing will connect at the top and bottom. To recharge the A/C, remove the black or blue cap, hook up the hose that comes with the refrigerant can, and pull the trigger. If your A/C becomes warm again within a matter of weeks or months, you may have a leak that needs further attention. Some A/C recharge kits have additives that seal small leaks.
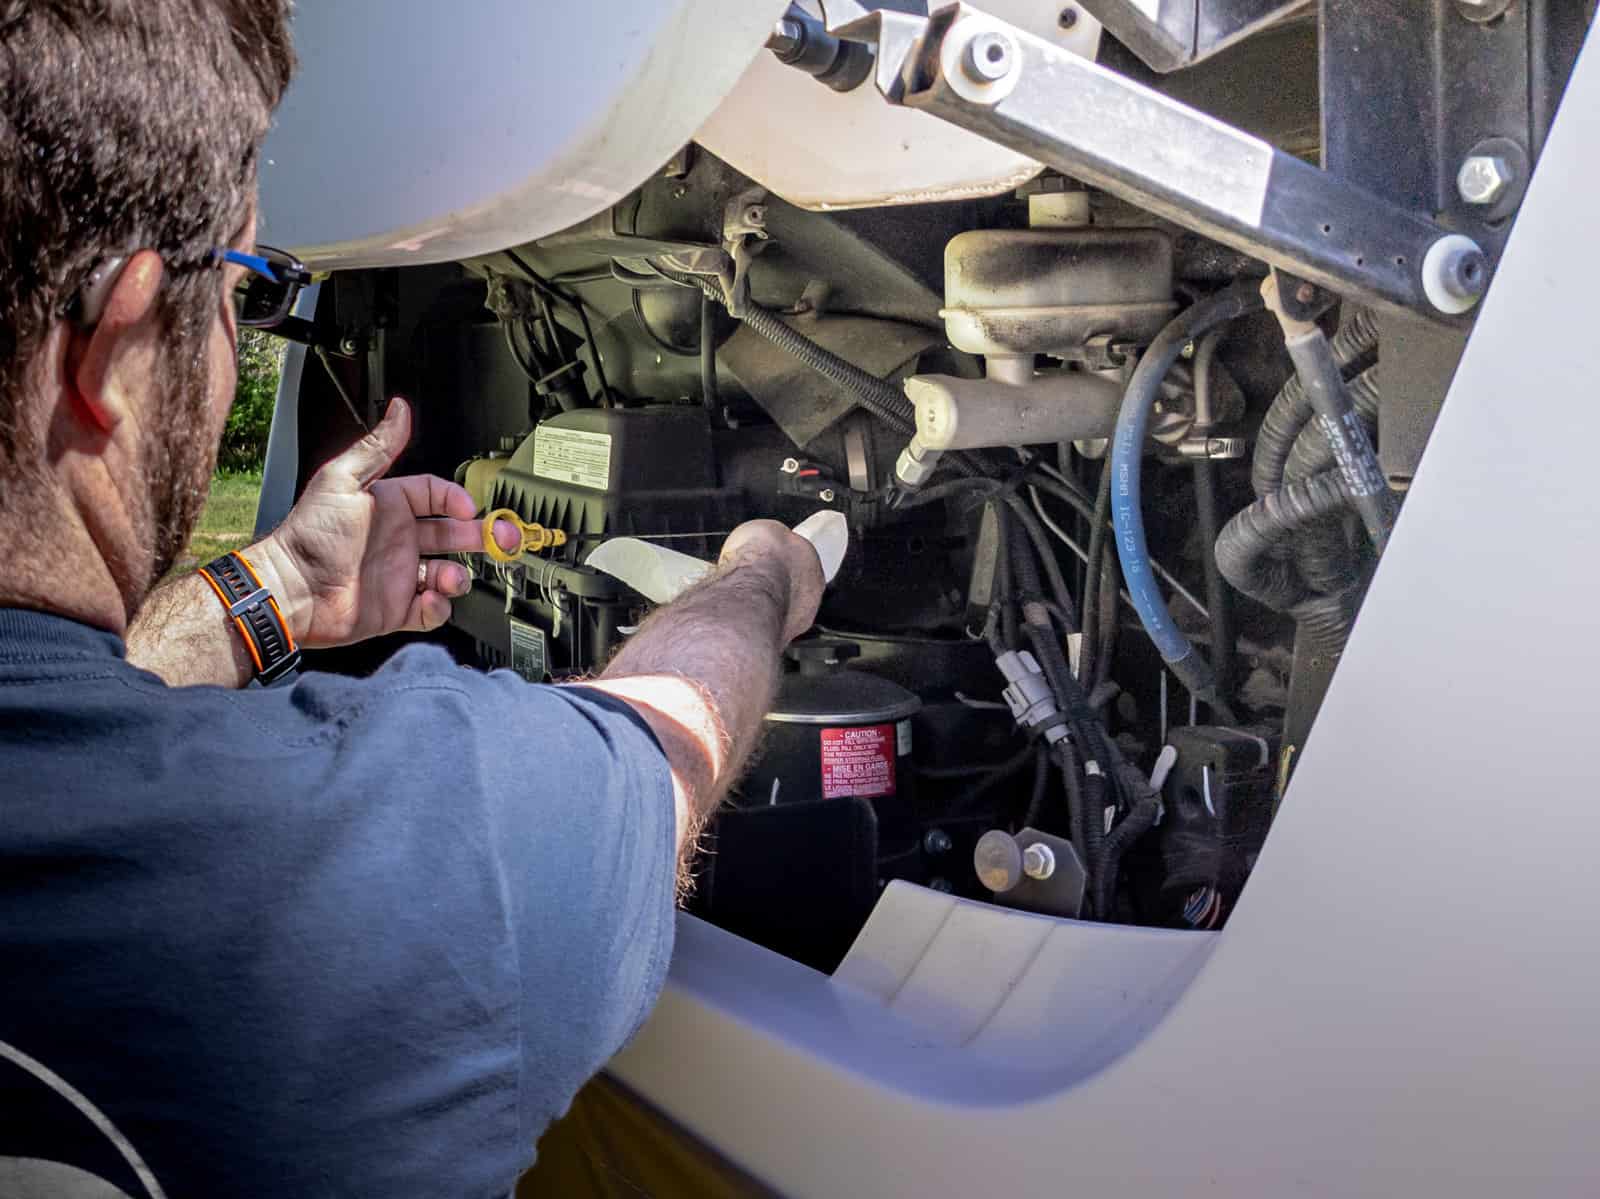
Power Jacks and Transmission Fluid
Your Class A RV probably has a power leveling system. Keeping the leveling system in tip top shape is an important part of RV maintenance. On my 2001 Fleetwood Pace Arrow, there’s a metal panel on my house battery bay’s back wall. On the other side sits a black cylinder tank that looks to hold about a gallon. The cap has a measuring dipstick attached to it that makes determining the fluid level easy.
RV manufacturers move the hydraulic tank around, so check your owner’s manual to figure out where they put it. I know that present-day Pace Arrows have the tank in a different place. Most likely, it’s somewhere around the front driver-side tire, and you’ll need a funnel with an extension tube to refill it.
Like any dipstick, unscrew the cap, wipe it off, put it back on, and pull it out again. If the fluid covers the full mark, you’re okay. Otherwise, it’s time to add some more.
You can use almost any hydraulic oil in your RV jacks, as long as it’s low viscosity. Some companies make a version specifically for RV jacks. Another option is transparent or pink multi-vehicle automatic (ATF) transmission fluid. Like oil, it comes in one quart or five-quart jugs.
ATF transmission fluid is a low viscosity lubricant. It won’t damage the jacks and works just as well. When you compare prices, a 5-quart ATF transmission fluid jug hovers around the same price as a one-quart hydraulic oil bottle. Many veteran RVers will keep a spare jug with them in their tool bay if they need to top off the jacks or transmission fluid.
After you check your transmission fluid dipstick, your panic monster may get the better of you because you can’t find the transmission fluid cap to add the fluid. Put the monster back where it belongs. The Ford didn’t include a transmission fluid cap.
Grab your funnel and slowly pour the fluid down the dipstick tube. This is one of those things where it’s so straight-forward your natural instinct is to overthink it. Like oil, transmission fluid does need to be changed out. Keep a weather eye open for another “Yes You Can” series article on how to change out the transmission fluid and filter on your Class A motorhome to your achievement list.
Power Steering Fluid
You can fill up your power steering fluid. The cap on the reservoir will blatantly say “power steering.” This tank has a dipstick connected to the lid, so wipe it off and conduct your measurement. When you top off the red fluid, don’t go above the max fluid level.
Like motor oil, power steering fluid has synthetic and other additives worth considering. Variations include Domestic, Asian, and European models. Using a version with a leak stop feature might be a good idea. Parts wear down over time. The additive seals off small leaks before they turn into big problems.
Camper Smarts Tip on Brand Specific Parts and Fluids: Ford recommends the Mercon V Fluid for their transmission and power steering systems. Cummins recommends a specific brand as well. The recommendations aren’t only for marketing reasons. Many of these auto and engine makers design their products with certain fluids and secondary components in mind.
Competitor products are just as good. The recommended product may have a proprietary ingredient or measurement the others don’t have. The result may boil down to less fluid or part changes by a tiny amount. Your RV service manager can go into detail about this issue. Most of the time, RV shops use competitor products because they work well and have a lower cost.
Radiator Coolant
Your Class A motorhome’s radiator uses air to cool the engine and transmission. The thin aluminum fin layers collect the heat from the coolant fluid. As you drive, the air that rushes in the opening of your front cap hood (on a gasser) and cools the fins.
Rear engine diesel Class A motorhomes (known as diesel pushers or DP) will have the radiator either on the rear cap or the driver-side rear quarter panel. Regardless of where your radiator is, you want to do two things: first, check the radiator for dirt or pebbles that may have become stuck between the fins. To straighten bent cooling fins, use a radiator fin tool to put them back in place. Some use flathead screwdrivers, but the fin tool is more accurate, inexpensive, and takes less time. Use the long tooth comb designed for radiators for the best results.
Meanwhile, the coolant fluid continues to flow around the engine and transmission, constantly removing heat from the parts to keep the components working at a safe temperature. On your dashboard, you may see a gauge with a vertical key floating in a water symbol. If you remember your driver’s safety course, the indicator shows you the temperature of your engine. A middle reading is optimal and high means you’re at risk of overheating.
If your engine heat indicator is running high, check your radiator fluid if you’re not conducting preventive maintenance. It’s always a good idea to keep a spare bottle of multi-vehicle radiator coolant handy to keep it topped off. The heat evaporates a small portion after a while. Radiator fluid also acts as an anti-freeze during the off-season when your RV’s in storage.
Using Water and Changing Out the Radiator Coolant
Some people think you can use water instead of coolant radiator fluid. In an emergency, you can use water. The problem with water is its properties. Water boils and evaporates. In low temperatures, it freezes.
When you’re in a safe place that allows you to work on your rig, you’ll need to drain the water out of the radiator, essentially changing out the fluid entirely. Under the radiator, you’ll see a hose that has a metal band around it. The band has ladder-like openings in it. Have a disposable tin foil pan ready to catch the liquid. Don’t use your oil jug because you want to use that for oil only.
When you loosen the screw on the ladder-like band, the fluid will come out quickly. You don’t need to separate the hose from its connection. Once it stops, tighten it back up. After that, follow the instructions above to refill the reservoir. Turn your engine on to cycle the new fluid through. The water that’s still in the system will evaporate out, so don’t worry about it.
Window Washer Fluid
Almost everyone knows the light blue gallon jugs of window washer fluid. Finding the see-through reservoir isn’t tricky. You may need a funnel with an extension hose to reach it if the RV designers put it in a weird spot. You may want to use the orange windshield washer fluid during the fall or early spring because it doesn’t freeze in cold weather. It helps de-ice your windshield in the winter.
There’s a green version of window washer fluid that’s great for washing bugs off the windshield. If you’ve ever driven through a lovebug swarm in Florida, you know how quickly they can completely cover your panoramic windshield, blinding you. No amount of scraping, window washing, or other technique will thoroughly eliminate them once the sun bakes them on.
The bug wash version has an enzyme that does a better job removing the bugs than normal windshield fluid. I only buy this type of fluid for my RV and always keep a spare bottle with me.
Engine Filters
If you haven’t learned by now, the RV World doesn’t use standardized parts. During the backlog of the COVID-19 Pandemic, RV manufacturers substitute upgraded components because third-party vendors are waiting for parts.
Finding the right filter for your motorcoach is less of a hassle than coach parts, even if you have an older RV. The auto manufacturers prefer standardization of components due to the high volumes and the many models they produce. In many cases, you’ll find these filters and fluids at an auto part store and a camping store. You can get discounts at stores by signing up for their discount programs.
Air Filters
For your motor to work correctly, it needs air. The filter prevents contaminants from getting into the engine. You should change your air filter every 12,000-15,000 miles. You’ll see the paper-like fins have black pollutants, but that’s normal. If you spread them apart, you want to look a the innermost area. If the fins are completely dirty to the point where they look clogged, that’s when you need to change the filter. If you’re on a camping adventure, wait until you get home to change the filter.
Changing your RVs air filter does make a difference. Think about it like this: if you were to put two or three face masks on, more than likely, it would be harder for you to breathe. A heavily dirty air filter makes it difficult for air to get into your engine. As a result, it makes the engine work harder, reducing fuel-efficiency and hinders acceleration. Extreme symptoms of a clogged air filter include black smoke from the exhaust, engine misfires, and strange noises, to name a few.
The best way to find out what type and model number of air filters you need is to locate the housing, pull out the filter. Write down the brand and product number. Check the other brands for the same filter. The competitors may offer their version or a better price.
Popular brands include:
- Fram
- K&N
- Premium Guard
- ACDelco
- ECOGard
The Cummins diesel engines and the new Ford V8 Godzilla gasser use a square or rectangle air filter. Older Ford Triton V10s use a wide round filter with a black center cap. Make sure you place the new square filter fin-side down. If the air filter is backward, it will clog up quickly and not perform correctly.
What You Won’t Find On a Class A Diesel Motorhome
If you are performing RV maintenance on a diesel motorhome, you don’t need to waste your time looking for a brake fluid reservoir or cabin A/C air filter (unless your owner’s manual explicitly states you have the filter). Class A Diesel RVs don’t have them. Passenger vehicles have the filter located behind your glove box, but RVs don’t. Your coach rooftop air conditioners should have filters inside the intake that clean your interior air.
Diesel Class A drivables use air brakes instead of the hydraulic systems passenger vehicles use. You’ll find thick rubber bladders on the axles that puff up when you turn the ignition over. There are a few ways to test the bladders and the brake system.
Grab a spray bottle and mix up some soapy water. Make sure your jacks are down, and your wheel chocks are secure. With the engine running, spray the bladders by the wheels with the water. If you see it bubbling, there might be a leak in the bladder. If so, get it checked out by your RV service center.
You can conduct a series of tests to make sure your brakes and air compressor are performing correctly, as stated by one of the many members on the iRV2 Forum. Once you turn your RV on, give it a few minutes to allow the bladders to fill up. Press the service brake (the regular brake, not the parking brake) entirely in two-second intervals.
You have two pressure gauges on your dashboard that give you the readings for the front and back air bladders. Every time you press the brake, the needles dip a little. Continue this process until you hear the compressor start. The maximum air should be around 130 psi, and the compressor should kick on approximately 85 psi. Check out the thread’s last entry from user RV735 on the forum thread for other tests to check your air system.
RV Generator Filter and Spark Plug
By now, you should feel pretty good about yourself. You may have struggled with warped housing pieces when you tried to put things back together, but you did it. Also, the equipment under the hood shouldn’t be scary anymore. You did the RV maintenance by yourself and didn’t need to take it to your RV service center and spend almost double what you just paid in supplies.
The generator air filter works the same way. Every 50-100 hours of use, you’ll want to spend some time checking out your generator and give it some exercise once a month. Check out this article from RV LIFE for other great tips.
The part looks different, but changing it out is the same operation. You will want to check the spark plug, though. You need to change it out every 450 hours to keep the generator working optimally. The first thing you need to do is locate where the spark plug is and disengage the breakers on the generator for safety.
When you separate the cable, it requires a twisting motion. Don’t try and muscle it; otherwise, you could break it. You’ll need a socket wrench or an adjustable wrench to unscrew the spark plug from its port. Once out, this is a great time to clean the cable and the surrounding area.
When you buy your new spark plug, you’ll want to pick up a spark plug measuring tool if you don’t already have one. The gap between the plug and the metal piece above must be at a specific spacing to work correctly. Your generator’s owner manual will tell you what that gap requirement is in detail.
Be very careful when you screw the spark plug back into place. You don’t want to strip the teeth and have the plug sit at an angle. Start by screwing it in by hand, and then use your wrench to tighten it. After it’s tight, connect the cable and close the cover.
Congratulations, You Did Your Own RV Maintenance!
You’ve accomplished a lot today, and you should be proud of yourself. Keep the extra fluids around when you conduct your preventive maintenance. You never know when something will need a top-up. Keep the brand and product numbers in an easy-to-find file on your computer or mobile device for the future like you did with your oil change parts.
As you become comfortable with these tasks, you can combine all of this when you perform your following oil change. Meanwhile, break out the outdoor furniture and pop open your favorite beverage. It’s time to relax and enjoy your accomplishment.
Keep your wardrobe and tools close because there’s more to come. To help you gain full proficiency and pride, I’ll show you how to change the transmission fluid and gas filter soon. Those looking for help with their Class B, Class C, and towable RVs won’t have to wait long to gain the confidence that comes with learning how to maintain their coaches’ automotive components.
You can keep track of that RV maintenance using a tool like RV LIFE Maintenance, part of RV LIFE Pro.
Make sure you sign up for the Camper Smarts Newsletter, so you don’t miss the articles. You can also learn a lot more about all things RV through Camper Smarts, Do-It-Yourself RV, RV LIFE Campgrounds, and the many others in the RV LIFE network.
Don’t forget to print out the shopping list below to help get everything you need.
About the Author
Although he’s from Motown, Brian is a legacy RVer that grew up on I-75. He, his wife, and two working-class fur-babies have enjoyed the full-time RV lifestyle since 2017. Like John Madden, he hasn’t “worked” in years because he gets to write about his passion. When he’s not working, he supports his daughter’s dog rescue efforts and disability causes. Learn more with him on CamperSmarts.com
Shopping List of Items You May Need to Purchase For RV Maintenance
- Air conditioning refrigerant kit
- Hydraulic oil or multi-vehicle transmission fluid
- Power steering fluid
- Multi-vehicle radiator fluid
- Radiator fin tool- long tooth
- Window washer fluid (regular, bug, cold-weather)
- Engine Air filter [Brand:______________ Model # __________________]
- Generator air filter [Brand: ____________ Model # __________________]
- Generator spark plug [Brand: ___________ Model # ________________]
- Spark plug measuring tool


I do my RecreationVehicle maintenance myself.
But I never cook myself… well, almost never.
No brake fluid needed? I believe there are new recommendations to flush the system every few years. You should at least check the level and use the correct fluid number to fill.
You mention that in an emergency you can use straight water in the radiator, this is not recommended in a diesel engine. Water that is not mixed with diesel anti-freeze will cavitate where it is in contact with the cylinder walls and could burn a hole in it.
Thanks for all the good tips. Just a couple of adds…there is a Chevy engine in the mix based on the years you mention. I have a W22 class A chassis with a Chevy.
Also, there is brake fluid and my levelors are electric motors, not hydraulic.
I will use your checklist!
Thanks again.
LargeMarge:
Thanks for your comment. When I read it, you reminded me of that Home Improvement episode where the guys from K&B Construction used their cars and power tools to cook their meals.
Anyway, I tried to teach my Daughter how to do her own auto maintenance when she first learned to drive so she knew what to do and to be an independent person. She didn’t get all of it, but at least she knows how to spot an over-priced service shop.
Make sure you keep receipts of the maintenance fluids you use. We did our own lube and oil and later had a problem with head gasket. Insurance refused to pay because we had no proof of maintenance. Had to take it to resolution to get them to pay.
Gail Hunter,
That’s a great tip. You also want to keep your receipts and create a maintenance history record if you ever decide to sell. If you can prove the RV has been maintained correctly, it gives you an advantage during the price negotiations.
Gail’s point is also true. Insurance companies need proof if you do any work yourself.