For those of you that hit the road on a journey of self-discovery, self-empowerment, or just because it’s there, I’m sure you’ve read a lot about how to keep the coach section of your motorhome going. When it comes to anything under the hood however, you may have that “avoid at all costs” mental block because it’s one area of your RV that’s too foreign. An RV oil change might be just the thing to tackle to build your confidence.
I’m here to tell you:
- You CAN learn it
- You CAN maintain it
- You CAN fix it
Self-empowerment comes from leaving your comfort zone and doing it yourself. I’ll take you through an easy maintenance procedure by taking it one step at a time. You can conquer your fear of what’s under the hood. Many RVers who learned how to complete the maintenance on the automotive part of their motorhome found it empowering, easy to achieve, and are more confident about the RV experience. You’ll also find that it’s the cheapest oil change compared to RV oil change service centers near you.

Being Camper Smart doesn’t mean you only have a comprehensive knowledge of the RV World; it also means you have the skills to handle those common and unexpected challenges that come up when you’re living the RV life.
In this discussion, I’m going to prepare and walk you through an RV oil change. I’ve designed this walk-through for men and women who’ve never attempted this before. We’ll show you what supplies you’ll need, how to find the correct oil, how much, and where the components on your motorhome exist. Together, we’ll go one step at a time to complete your RV and generator oil change.

Let’s Do An RV Oil Change!
What Qualifies Me to Be Your Guide?
I didn’t have a career in an automotive or RV oil change service center. When I tried to take auto shop classes in high school to learn the basics, the counselors wouldn’t let me because I was on the “College Prep” track. When I tell fellow RVers, I’m from outside Detroit, Michigan, some would assume I had oil in my veins and could answer many of their automotive questions. I felt like I was the only guy from the Motor City who didn’t know cars (my Dad taught me a few things, but gearing ratios and catalytic converters are way over my head).
My knowledge and expertise come from the guidance of experts showing me how and trying it myself. As a Class A motorhome full-timer, watching, learning, asking questions, and having an expert watch me perform these simple maintenance procedures gave me the skill and confidence to do it independently. Yes, I looked foolish doing the “Happy Dance” in front of the expert, but it was well worth it because I did it and did it well.
Preparing For the RV Oil Change
Psyching Up
First and foremost, you need your playlist. Heart, Joan Jett, Rush, Led Zepplin (gotta get the Led out), and other 1970s and 1980s music are great tunes to get your heart and mind going. Most call this Classic Rock, just don’t call it “oldies” or you’ll be scrubbing my RV with a toothbrush!
Next: Wardrobe. I went with my 1980s punk grunge look; a.k.a. An old pair of jeans and a T-shirt I wouldn’t miss if I became oil soaked. I always keep a pair of “mud shoes” in an exterior bay for things like this. These shoes are an old pair that have outlived their daily usefulness, but are great for messy tasks.

Discover Your Engine Identity and Oil Requirements
Before I did anything, I researched my engine and the type of oil I needed. I have a gas engine in my motorhome. If you have a Class A motorhome from the 1990s or later (with a few exceptions), you have one of the following engines:
Gasoline Engine
If you have a gas engine (gasser), you probably have a Ford 6.7 liter V10 Triton. Gassers built in the 2020 model year or newer have the Ford 7.3 liter V8 Godzilla engine.
Diesel Engine
If you have a diesel engine, you probably have one of the Cummins, CAT, or Detroit engines. Diesel engines can be found in both the front or rear of the coach, triggering acronyms like; FRED (Front Engine Diesel), RED (Rear Engine Diesel), or DP (Diesel Pusher). Check your owner’s manual to verify which engine you have. RV manufacturers usually use the Cummins ISL9 or B. Only the massive 40-45 foot million dollar behemoths use the X12 or X15 engines. An easy way to check is to go outside and look at your front quarter panel or your rear cap. Auto manufacturers love to advertise what engine is powering your RV.
What about smaller RVs?
Smaller RVs, such as a small Class B or Class C, will have a variety of gas and diesel engines. Since those RVs are more car-like, changing the oil in these isn’t much different than changing the oil in your SUV or minivan. Our focus in this article is on the larger RVs.
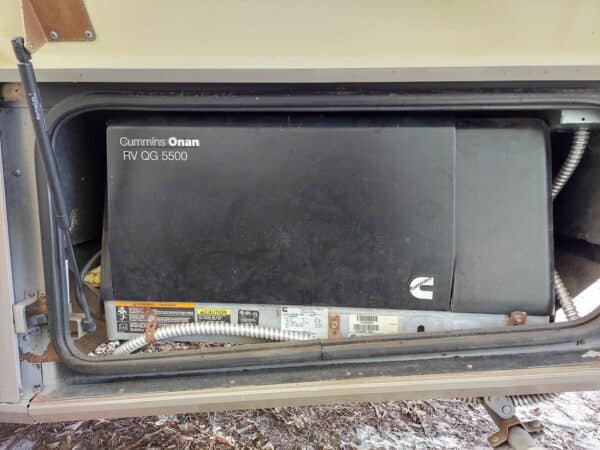
Identify Your Generator
Once you know your RV engine, do the same thing with your built-in gas generator. Most of them are going to be an Onan Cummins Generator. Your goal is to determine how much oil, what kind (oil weight), and what size oil filter is needed. Unfortunately, the RV Industry doesn’t standardize parts like the car industry, so you can’t assume.
The amount of oil you’ll need depends on your engine’s specifications. It could be 8 quarts or higher than 16 quarts. Diesel engines have a lot of moving parts that need lubrication. Generators usually take less than five. Oil comes in single or five-quart containers. It’s always a good idea to keep an extra quart or two in your hardware bay. Generators are notorious for burning a little oil. If you run low, having that extra quart with you makes it easy to top off when you need it.
Choosing the Best Oil for your RV Oil Change
Now that you know your engine and generator (genny) oil and filter needs, you can go to the auto store and pick up everything you need. Even though it’s the 21st century and the time of tolerance, this will be your first test. Don’t let them push you around. You’ll know what you need and how much of it to get. If they tell you there is no way you need 4 gallons of oil, stand firm! They may have never dealt with a diesel pusher before.
Brands are the same, but there is a difference between conventional (real) oil and synthetic oil. Full synthetic oil is better because it has a better purity and handles outside temperatures better. While it has a higher cost, you can go longer without an oil change, and the oil is still efficient in low and high temperatures.
Synthetic blends are just that: it’s a mixture of conventional and synthetic oils. Blends are less expensive than full synthetics. You can run longer without an oil change compared to conventional oil. It’s the best of both worlds at a cost-advantage.
Conventional oil works best for short trips and engines that specifically require it. Experts generally agree that motorhomes function typically better with synthetics. On the other hand, if you change your oil because you’ve passed the required time limit instead of the mileage limit, save yourself some money and use conventional.
Oil Weight
Oil comes in different weights. 5W is going to be thinner than 10W. Lower weights are better for colder temperatures in the Snowbelt states. If you’re mostly cruising around the Sunbelt, 10W or even 20W oils are your best choice.
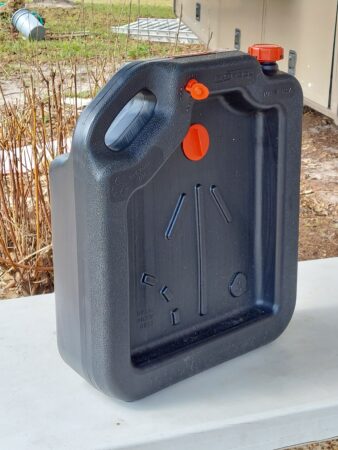
Combination oil pan jugs have made the oil change process cleaner and so much better. On one side, they have a shallow collection area that funnels into the container. Once all of the dirty oil is inside, you seal it up with a rubber plug, wipe it up, and take it back to the auto store or oil service center to be disposed of properly.
Author tip – What to do with used oil: Being a Divorcee myself, there is a temptation to pour it all on anything you have of your Ex-spouses’ and watch it burn. It looks great in the movies, but unfortunately, it’s illegal due to the high air pollution effect and general fire danger it creates. I recommend recycling instead.
Oil Filters
Oil filters are cylindrical components that collect any contaminants that flow through the oil after it goes through the engine. The combustion chambers build up residue and other things over time. The oil keeps the engine lubricated and cleans out the residue. Different brands use various types of materials to filter the oil.
When the auto store reps tell you that one is better than the other, they mean that the filters do a better job collecting particles, the filter stays efficient longer, and other brand-specific features. It’s not due to internal incentives or other sales gimmicks.
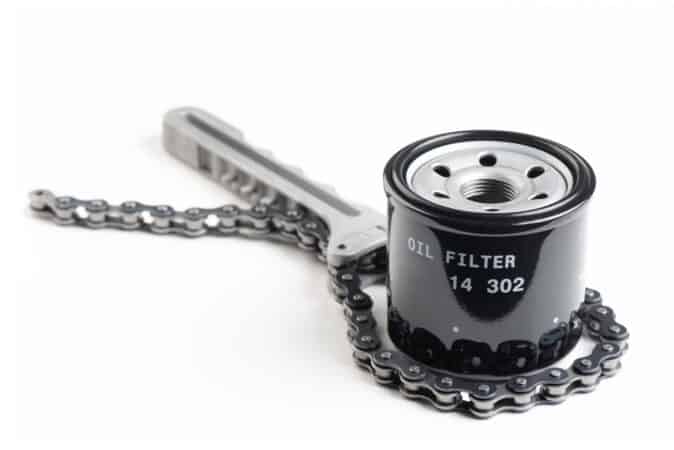
Don’t forget the oil filter wrench. Filters are near impossible to unscrew without one. Some look like wide wrenches, and others fully wrap around the filter. It will take a little muscle to break the seal, but it should unscrew easily once you have it loose. Most oil filters come with the window sticker reminder so that you can write down the date and mileage for your next change. Make sure you use a Sharpie marker or ballpoint pen when you write on it. I used a gel ink pen my first time, and window moisture wiped it clean within a few weeks.
How Many Miles Can You Really Go Without an RV Oil Change?
Modern RV engines and current oil technology extend oil changes to 4,000-5,000 miles. The 3 month/3,000 mile method is still a good idea because it keeps your engine in the best shape. If you’re in the middle of a trip and you turn 3,000 miles, don’t concern yourself with changing your oil. Wait until after the fun’s over. Your “Big Pretty” will be just fine.
Diesel pusher owners are typically advised to change their oil annually. It’s extremely rare for an RV to get enough miles on it to need to do so sooner than that, however sitting idle is just as bad. For most diesel RVs, the annual oil change recommendation stands.
Many campgrounds don’t allow you to perform oil changes. Pulling your RV around the back of the auto parts store or elsewhere that allows it is okay.
Cost Comparison
I want you to keep track of your expenses. The oil pan jug, wrench, and other reusable supplies won’t count. Focus on the oil, oil filter, and other things you’ll need to buy every time you change the oil. Your time is valuable, but here are some costs of service center prices to keep in mind.
A non-chain service center charges up to $275 to replace the oil filter and change no more than six gallons of oil (using conventional oil). The generator is an additional $75. The pricing is for a Class A gasser. For diesels, the oil change and filter jump to $310 with the same six-gallon limit as a minimum, and often go much higher, particularly if other annual maintenance is performed at the same time. The generator also increases to a cost of $110. Camping World oil chain costs and Walmart RV oil change prices aren’t published but expect their pricing to orbit around that price level.
RV oil change costs will have higher pricing when you go to an RV oil change location near you. The shop has overhead costs and employees they have to pay. If they allow it, it’s cheaper to bring your own oil for an oil change. Walmart, for example, has a flat price that covers their costs for the service.
While this discussion on changing your oil focuses on self-empowerment, saving a substantial amount of money by becoming a do-it-yourself RVer should add even more to your self-confidence. Think of it this way, would you prefer to give that money to an oil service center or spend it on that nice bottle of wine to celebrate your victory as you enjoy the sunset from your outdoor recliner?
The Main Event – Changing Your RV Oil
You have your playlist, you have your wardrobe, and you have your equipment. Put your paranoid and fear monsters back in their cages where they belong, and let’s do this.
Let’s review what you need:
- The correct amount of oil
- A plastic or paper funnel
- Oil filters for the engine and generator
- Oil filter wrench
- Oil pan jug
- A socket wrench or adjustable wrench
- Safety goggles
- Disposable latex gloves or a substitute
- A whole roll of paper towel
Note that it’s a good idea to run the engine for 2 minutes or so to warm it up a bit so it will flow easier. You don’t want it so hot you can’t touch the oil pan and filter however. About 2 minutes should do it.
Step 1: Unplug your motorhome from the shore power, close your propane tank, and shut everything down. You won’t be anywhere near the electric or propane lines, but there’s no such thing as being too safe.
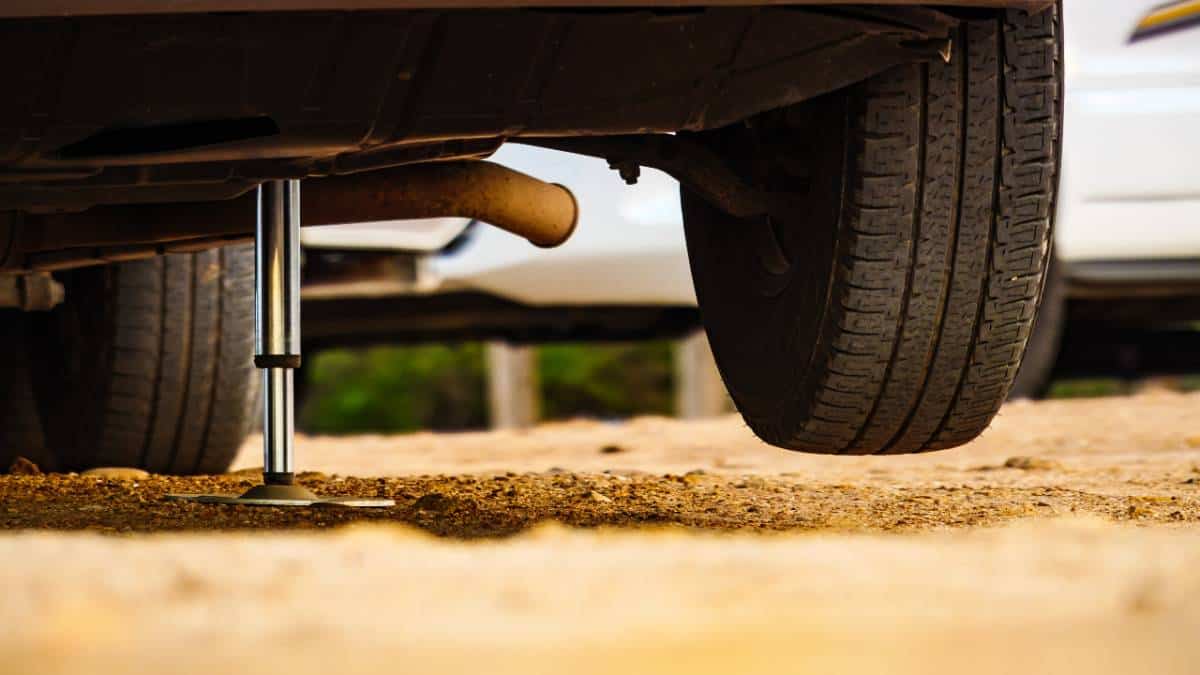
Step 2: Make sure your wheel chocks and stabilizer jacks are firmly set. You should have enough clearance to crawl under your motorhome without needing to raise it. If you need to, add some stacked jack pads under the tires to increase the clearance underneath your motorhome.
Step 3: When you crawl under your motorhome, make sure you push the oil pan jug, oil filter, oil filter wrench, socket, or adjustable wrench underneath. Use safety goggles or something else to protect your eyes. Oil and eyes don’t like each other. You’ll want to use disposable latex gloves or a substitute because your hands will end up with oil on them.
I found that the best crawling technique is the low crab-crawl using your elbows and feet facing up. You could do the face-down trench crawl, but you might not have room to flip over (this is one of the many reasons my father gave me the unofficial nickname “hard-way”).
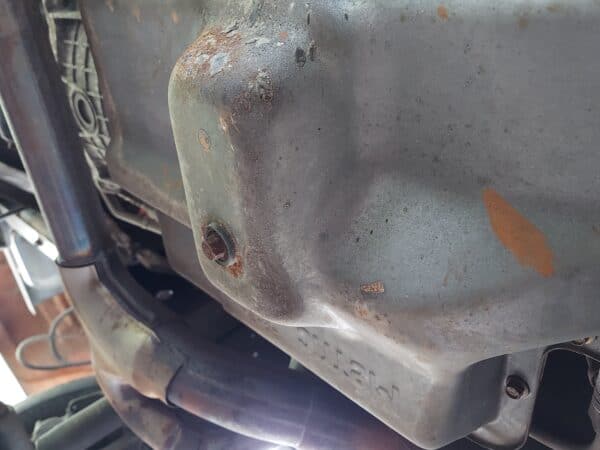
Step 4: In a gas motorhome, you’ll find the motorhome’s oil pan behind the front axle. BEFORE you loosen the oil pan plug, line up your jug. It doesn’t have to be perfect; you want to make sure the oil drains onto the jug. Open the plug and let it rip. As the oil drains, you can adjust the jug position. If you have a newspaper, plastic sheeting, or something else you can lay underneath the jug, you could use it to ensure the ground doesn’t get exposed to the oil. Using a drop cloth is precautionary and shouldn’t be much of an issue.
Step 5: If you wait until the oil completely stops, you’ll be under there for hours. Once the RV oil gets to a slow drip, go ahead and replace the oil pan plug. Don’t over-tighten. You don’t need a torque wrench, electric drill, or anything fancy. If it’s tight for you, you’re good.
Step 6: Before you go anywhere, grab your oil filter wrench and loosen the filter. You want to have the oil jug underneath because the oil will flow out. Don’t be afraid to use two hands. Once it’s loose, wait until the oil stops flowing. Afterward, you should be able to remove it by hand. Lube the rubber gasket on the new filter with fresh oil, and screw the new one in place.
Step 7: Crawl back out and bring everything with you. Place the plug in the oil pan jug and wipe it clean with paper towel. Set it aside since you’ll need it for the generator later.
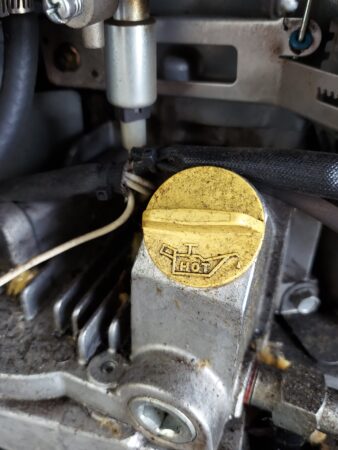
Step 8: Now it’s time to go under the hood. The only thing you’re looking for is the oil cap, which should be adequately marked. You may need a plastic funnel to pour the new oil into it. Loosening the cap might take some effort because whoever tightened it previously may have overtightened it.
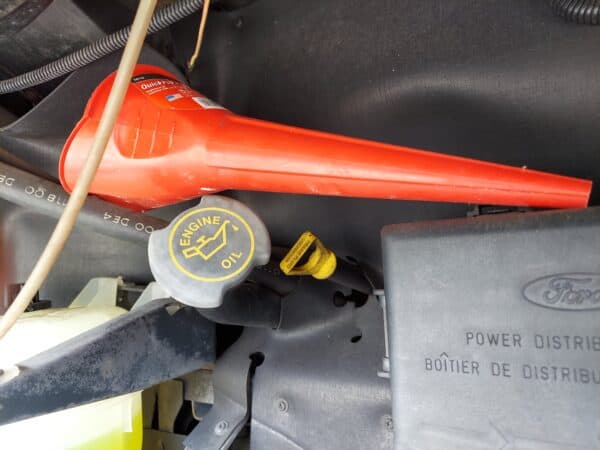
Step 9: Set your funnel and pour in the correct amount of oil. The 5 quart bottles are heavy. I used one of the single quart bottles first, then funneled the 5-quart bottle into the single bottle, pouring in a portion of the five-quart until the bottle was empty. Working smarter, not harder, saved me from injury and denied my wife getting that picture of me looking like an oil creature from the deep.
You’ll notice the single quart bottles have an opening to one side, and the rest of the top slopes down. The design makes it easier to pour. When pouring, keep the opening up, so the bottle stays under it. Slowly tip it into the funnel until you get a steady, manageable flow.
Step 10: Once you’ve poured in the right amount, grab some more paper towels. Near the oil cap, there should be a T-like handle you can pull out. It’ll have a long metal stick connected to it. The device is called the dipstick. On the end, you’ll see a graded area with some markings.
Wipe the end clean.
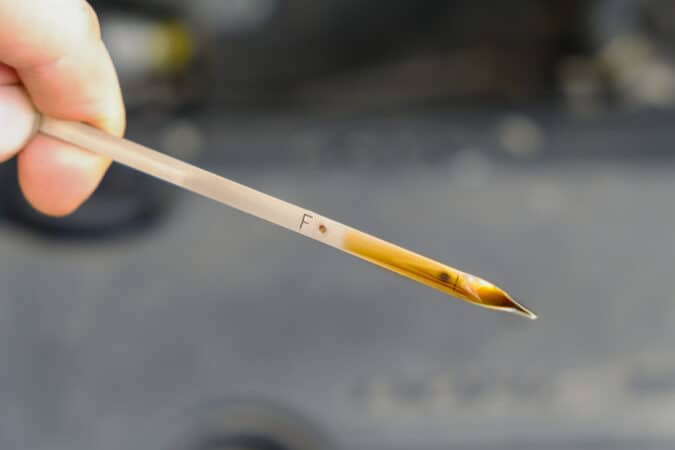
You’ll see that the graded end tells you where your oil level should be. Replace the dipstick completely, count to 5, and pull it again. The new oil should cover the whole graded area. If it’s a little above, don’t worry. Replace the dipstick and head inside.
Step 11: Start the engine and let it run for a few minutes. You need to give it a few minutes to give it time to run the oil through the new filter and fill it completely.
Camper Smarts Tip: Never run your engine without a refilling with oil first. Dry engines will seize and ruin quickly, resulting in catastrophic engine failure.
Step 12: Turn the engine off and repeat the dipstick procedure. Pull it, clean it off, replace it, then pull it again. If the oil still covers the entire graded area at the end, you may begin your happy dance. Go ahead, like Men Without Hats sang, “…we can dance, everybody’s taking the chance.”
Changing the Generator Oil
Right now, you should be feeling pretty good. After your “Safety Dance,” you might be thinking about that new year’s resolution you made about getting back into shape. Forget about that. You just accomplished something new. You’re in a no-negative zone right now. It’s positivity and accomplishment right now.
Now it’s time to take on the built-in generator. The procedure is virtually the same. After the motorhome engine, this should be a cakewalk. As the Wilson Ladies from Heart sang, “[We’re] comin’ straight on for you,” generator.
The generator may take a different oil weight. You may find your generator’s owner manual works for the whole series, not the specific model you have. When I dealt with this, I lived up to that unofficial nickname my father gave me by doing it the hard way: I guessed.
When I tried to fit the oil filter on, I found out it was too big. The old oil filter didn’t have any markings on it, and I couldn’t take an oil-soaked part with me to the store. So I looked at the model number and serial number on the generator ID sticker and called my dealer’s tech support line (which I should’ve done in the first place).
The rep looked it up and went to the auto parts store. I bought the new one (forgetting to bring the first one to return it) and finally had the right part. Do you see why I’ve earned my nickname?
The oil cap on your generator may double as the dipstick. The oil pan plug should be accurate in the owner’s manual diagram. It may camouflage as a piece of hardware. It may take a screwdriver to loosen it.
Camper Smarts Tip on Generator Inspection: Since you have the genny open, this is a great time to grab a flashlight and perform a visual inspection. Mice and other critters like to use the insulation for nesting. They like to chew on wires and generally make a mess of things. When you crank up your generator, you might get see a panicked critter jump out.
To have a mouse-free RV, we recommend using RV mouse shields. There are chemical treatments and screen-like mesh products you can install to keep stow-a-ways from catching a free ride and causing trouble.
Congratulations, You Did It!
As you enjoy your favorite tea, coffee blend, or other beverage while you sit outside under your awning, don’t let the nay-sayers ruin this for you. You took a huge step forward towards RV independence. You and I both know they felt the same way the first time they accomplished something like this. RVers that stick to the spirit of the RV Community will stop by and share in your joy.
There’s still more to learn, but I’m sure you’re feeling much more comfortable about what’s under the hood of your motorhome. There are some filters and fluids under there that we’ll talk about next time that only take a few steps to maintain.
Meanwhile, if you’re ready to learn more, check out the Camper Smarts, RV Life, and Do-It-Yourself RV websites for the best info under the hood maintenance and other procedures. All of us have weekly newsletters that keep you up-to-date on the latest information and trends in the RV World.
About the Author
Although he’s from Motown, Brian is a legacy RVer that grew up on I-75. He, his wife, and two working-class fur-babies have enjoyed the full-time RV lifestyle since 2017. Like John Madden, he hasn’t “worked” in years because he gets to write about his passion. When he’s not working, he supports his daughter’s dog rescue efforts and disability causes. Learn more with him on Camper Smarts.com