Taking Care of Malfunctioning Sensors, Stinky Tanks, Bad Taste, and Leaks
Your RV water tanks do a very important job: They make sure you have clean water wherever you are and give you a place to put your leftover water when you’re done using it. As long as your tanks are doing their job, you probably don’t think about them all that much. That said, when something is wrong with your RV water tanks, you’ll probably take notice pretty quickly.
The good news? Most common RV water tank issues can be taken care of relatively easily. Here are the top four problems you might experience with your RV water tanks and how to tackle them.
Dealing with Malfunctioning Tank Sensors
Most RV water tanks come equipped with handy sensors that tell you how full the tanks are at any given moment. This is great because it helps notify you when freshwater is running low. These sensors also help ensure your waste water tanks don’t back up from being too full.

Unfortunately, RV water tank sensors are notorious for malfunctioning. They will often tell you your tanks are completely full right after emptying them, rendering them completely useless. The culprit is almost always some stray debris stuck to the sensor.
Luckily, it’s pretty easy to get your sensors working correctly once again. All you have to do is find a way to remove debris from the sides of the tank. A holding tank rinser or an RV toilet wand can get the job done.

- REVERSE FLUSH VALVE: Allows you to easily rinse and clean out…
- COMPATIBILITY: The 3-inch gate valve fits most drain outlets in…
- EMPTIES & FLUSHES HOLDING TANKS AND RV SEWER HOSE: Backfills and…
- BREAKS UP CLOGS: Forces water back up into the plumbing lines to…
- GATE VALVE: Closed position thoroughly flushes your grey and…
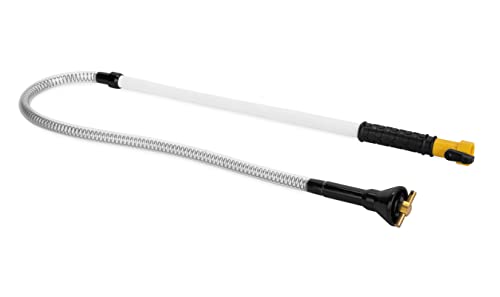
- POWERFUL ROTARY CLEANING ACTION: Enjoy superior cleaning power…
- FLEXIBLE REACH: The black tank rinser has a 34″ flexible section…
- SIMPLE TO USE: No need to worry about complicated setups— it…
- ERGONOMIC DESIGN: Our Easy Grip handle provides maximum comfort…
- DIMENSIONS: Easily clean and rinse your camper’s holding tank…
If you can’t get your hands on either of the devices mentioned above, it is sometimes possible to clean the sensors by filling the affected tank completely with fresh water and then allowing it to empty again.
If debris is not the cause, replacing the entire tank sensors may be necessary. We recommend Mopeka “Pro Check” sensors for their easy installation and high accuracy.
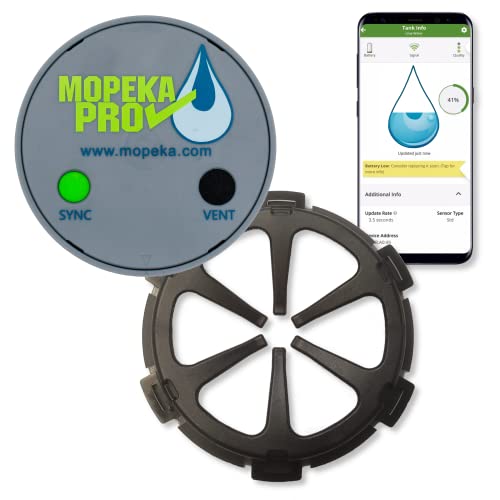
- WATER SENSOR – Wirelessly monitor the level of RV grey and…
- EASY INSTALL – Mounts to bottom using included mounting collar….
- IMPROVED BATTERY LIFE – Battery on the Pro Check Water Sensor…
- FREE APP – Mopeka “Tank Check” app is free from the Apple or…
Addressing Stinky Black and Gray Tanks
Most RVers deal with stinky tanks at one point or another. There are a few different things you can try to get rid of the stink and keep it away.
Flush Out the Tanks
Almost always, bad smells coming from the waste tanks are the result of buildup and debris in the tank. The obvious solution is to get rid of that debris. The backflush product mentioned above is great for this, and the black tank wand we linked can also be helpful in black tanks.
Checking the Tank Vent
If flushing out the tanks doesn’t get rid of your smell, check the tank vents on the roof. There should be one for the black tank and one for the gray tank, and both should be free of obstructions. Using a water hose to spray water down the vent pipe will help you determine if there is a clog.
Replacing the Ball Seal
Sometimes black tank smells come into the RV via the toilet because the ball seal is no longer sealing properly. If you notice your toilet is no longer holding water, it’s probably time to replace this seal and block those smells from entering your rig.
Adding Water to P-Traps
If you have a shower or sink you rarely use, it’s possible that the P-trap has gone dry, allowing gray tank smells to get into your RV. Try running water in all sinks and showers to ensure there is water in every P-trap.
Keeping the Black Tank Closed
Once you’ve managed to eliminate the unpleasant odors, it’s crucial to keep your black tank as odor-free as possible by keeping it closed until you’re ready to dump it. This is because if you leave the black tank open, the liquids will drain out, leaving the solids behind. These solids will then start to pile up, forming what is often referred to as a “poo pyramid”.
By keeping the black tank closed, you ensure that the solid and liquid waste is mixed, which aids in the breakdown of the solids and prevents the formation of the “poo pyramid”. Only when the tank is about two-thirds full should you open it to dump the waste. This way, the force of the liquid waste will help to flush out the solids, keeping your tank clean and odor-free.
Flushing with Lots of Water
Using a lot of water when you flush will also help ensure everything breaks down properly and keep smells at bay.
Using a Tank Treatment
If you continue to have problems with stinky tanks, you might want to consider using some sort of tank treatment. Many swear by probiotic treatments that help everything break down naturally. Others prefer the Geo Method (video below) of keeping the tanks clean.
What to Do When Fresh Water Has a Bad Taste
If the water from your fresh tank tastes off, stop drinking it and cooking with it right away. Take a day to thoroughly sanitize the tank before you use it again in order to ensure you aren’t consuming contaminated water, then add filters to your RV to keep the water tasting delicious no matter where you roam.
Read more on keeping RV water clean!
Handling a Leaking Tank
The last problem on our list is also the most difficult to solve. If you have a leaking wastewater tank, stop using it immediately in order to avoid dripping contaminated water onto the ground. Empty the tank as much as possible and place a container under the leak to catch any drips of water.
Certainly, here’s the same content in Markdown:
How to Repair a Leaking RV Water Tank
The next step in addressing a leak in your RV water tank is to assess the extent of the damage. If you’re dealing with a small to medium-sized crack, you might be able to repair the tank yourself. However, it’s important to note that RV holding tanks are typically made from polyethylene plastic, which does not adhere well to most adhesives. Therefore, you’ll need to use a special glue that is compatible with polyethylene plastic if you plan to patch the tank.
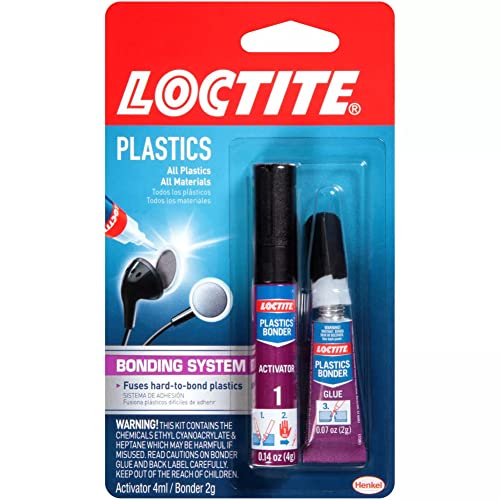
- Advanced Bonding System: Two-part adhesive formula includes glue…
- Fuses Hard-to-bond Plastics: Easily bonds to plastics such as…
- Tremendous Strength: Highly-resistant, strong cyanoacrylate…
- Sets In Seconds: Bonding system instantly dries transparent for…
- Weatherproof: Resistant to water, most chemicals, and freezing…
Read the label carefully and ensure that the adhesive works on polyethylene plastic. Additionally, any patch you use should also be made of polyethylene plastic to ensure a proper bond. This method can be effective for minor leaks or cracks.
Alternatively, if the damage is more extensive, you might need to consider a plastic welding kit with polyethylene strips. This kit works similarly to a soldering iron, allowing you to melt plastic strips into the existing tank, effectively “welding” the crack or hole shut.
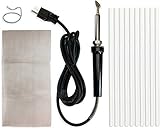
- Heavy-duty 200W welding iron
- 10 feet of polyethylene welding strips
- 5″ x 10″ stainless steel reinforcing mesh
- Welder stand
- Instructions on back of the package
This method can be more effective for larger cracks or holes, but it does require a bit more skill and care to avoid causing further damage to the tank.
When using either of these methods, it’s crucial to take safety precautions. Be sure to wear long sleeves and long pants, and choose clothes you don’t care about, as they may get ruined during the process. Pull your hair back and make sure you slip a pair of gloves on your hands. Always work in a well-ventilated area and avoid contact with your skin or eyes.
Replacing a Damaged Tank
If the crack or hole in your tank is on the larger side, you will probably need to replace your tank entirely. This has been done by handy RV owners in the past but is a bigger project.
The video below will give you an idea of what you’re in for should you choose to tackle a tank replacement yourself.
Of course, you will also want to keep up with the usual RV water tank maintenance. Make sure to add maintenance tasks to your RV Life Maintenance calendar so you stay on top of them.
In conclusion, maintaining your RV water tanks is crucial for a smooth and enjoyable RVing experience. By addressing common issues such as malfunctioning sensors, stinky tanks, bad-tasting water, and leaks, you can ensure that your RV water tanks function optimally. Remember, regular maintenance is key to preventing these issues from arising in the first place. Safe travels!
You May Also Like
Product data was last updated on 2024-04-29 at 12:32.


Glue is an ineffective repair method because it is inflexible and will inevitably leak again in a short time.
The ‘plastic welder’ you show is a poor tool. The problem that to make a good weld, the tank around the break needs to be brought up to near the melt temperature at the same time you melt the rod into the crack. The ‘wood burner’ type tools do not have the heat capacity or transfer capacity to do that.
You need a ‘hot air’ welder which is a bit more expensive and takes more practice and skills to use. It will do a superior job and can handle not only patches but replacing entire sides of a tank. https://www.amazon.com/dp/B07K24DP5H?th=1