RV hydraulic leveling system maintenance, besides being a mouthful, is brand-specific, meaning each has its own maintenance requirements. Fortunately, most of the procedures are similar, with small differences here and there, usually in terms of spray lubricants and cleaning requirements.
Sure, it’s not the most entertaining topic to parse through online, but it is one of the most important aspects of your routine, RV maintenance. If your RV isn’t properly leveled, it tends to cause all sorts of issues, including issues with the fridge, puddling water in the shower, sticking doors, cabinet doors swinging open, a bad night’s sleep, malfunctioning slide-outs, and more.
Leveling your RV is a fact of RV life, as immutable in necessity as the sun rising in the east and setting in the west. Regular maintenance not only leads to a happier camping life but also a cheaper one. Hydraulic leveling systems are costly to repair, and the damage an unlevel RV can cause is significant.

Understanding RV Leveling Systems
Your RV hydraulic leveling system requires routine maintenance for a reason. Though it’s a closed system by design, things tend to wear down over time. Understanding the basic function of an RV leveling system will help you identify potential issues well before they crop up.
Despite its name, an RV hydraulic system is part hydraulic and part electric. RV hydraulic leveling systems typically use Dexron or ATF fluid, but it’s always a good idea to check your manual and make sure. Don’t let the fact that hydraulic systems require more maintenance confuse you into thinking these systems are complicated.
A hydraulic system, though it sounds complex, operates on a straightforward principle and comprises a few key components:
- Fluid Reservoir: This is where the hydraulic fluid is stored. It serves as the starting point for the hydraulic pump to draw fluid, which is then circulated through the system.
- Hydraulic Pump: Powered by an electric motor, the pump’s role is to convert mechanical energy into hydraulic energy. This energy is what enables the lifting action in the system.
- Electric Motor: The motor provides the necessary power to the hydraulic pump, enabling it to function and circulate the hydraulic fluid.
- Valves: These components regulate the system by controlling the flow of hydraulic fluid and maintaining internal pressure within safe limits.
- Hydraulic Cylinder: Positioned at the end of the system, the cylinder plays a crucial role in converting the hydraulic power back into mechanical energy, completing the cycle.
In essence, the hydraulic fluid is directed into the appropriate components to create pressure. It’s this pressure that activates the jacks, allowing them to lift or move objects. The valves ensure that everything runs smoothly, preventing the system from over-pressurizing and keeping the operation within safe parameters.
Signs Your RV Hydraulic Leveling System Needs Maintenance
If you practice preventative RV hydraulic leveling system maintenance, the issues we cover in this section will be few and far between. Of course, that’s the entire idea behind preventative maintenance, making it one of the most important actions you can take throughout the life of your RV.
Though the system is simple, there are several components, and the more components there are in any system, the more potential there is for problems down the road.
Common issues include:
- Jacks won’t extend or retract: This is a common symptom of issues within hydraulic systems, often related to inadequate hydraulic fluid levels, air in the system, or mechanical failure of components.
- Jacks fail to hold their positions: This could indicate a leak in the hydraulic fluid system or failure of the valves that maintain hydraulic pressure.
- The leveling system is not working at all: This could be due to several factors, including electrical problems, pump failure, or severe hydraulic fluid issues.
- Excessive noise (grinding, whining, or creaking): Such noises are typically indicative of mechanical issues, low fluid levels, or contamination of the hydraulic fluid, which can affect the system’s efficiency and health.
- Signs of fluid on the ground: Leaks are a clear sign that the hydraulic system needs maintenance. Leaking fluid can lead to loss of pressure and system failure.
- A change in the smell of the hydraulic fluid: Changes in the odor of hydraulic fluid can indicate contamination, which is detrimental to the system.
- Hydraulic fluid is milky, pink, foamy, or dark: These are signs of water contamination, air in the system, or degradation of the fluid, all of which can compromise the system’s performance and longevity.
There’s no such thing as hydraulic fluid that never deteriorates over time. Like everything else, hydraulic fluid has a shelf life, especially if you are using the system a lot. The best way to determine that the fluid is bad is to test it. However, most RVers don’t have chemical labs inside their campers. Visual and smell comparisons have to suffice.
Bad hydraulic fluid will have a very different smell. In fact, hydraulic fluid can become infested with bacteria, especially if it just sits unused for a long period of time. This bacteria contributes to the overall chemical breakdown of the fluid.
Preventative Maintenance Tips
On the bright side, hydraulic system care is relatively simple. It’s just a matter of getting it done. You don’t have to go full-on Sherlock Holmes and break out the magnifying glass every time you park your RV. But you should have a routine or, at the very least, use your downtime to give the system a good look-through.
Regular Inspection And Cleaning Of Components
RV hydraulic leveling system maintenance begins and ends with visual inspections. After all, other than a malfunction, how are you going to know something is amiss if you don’t look? Before your first go-round, be sure to check over the manual associated with your system, whether it’s a third-party, aftermarket installation, or a part of your RV manual.
This will help you recognize the various components, and you’ll have a better understanding of how the system functions. Some manufacturers suggest a routine cleaning process and recommend specific RV maintenance tips. For instance, one manufacturer may recommend WD-40 post-washing. Others may recommend something different lubricant.
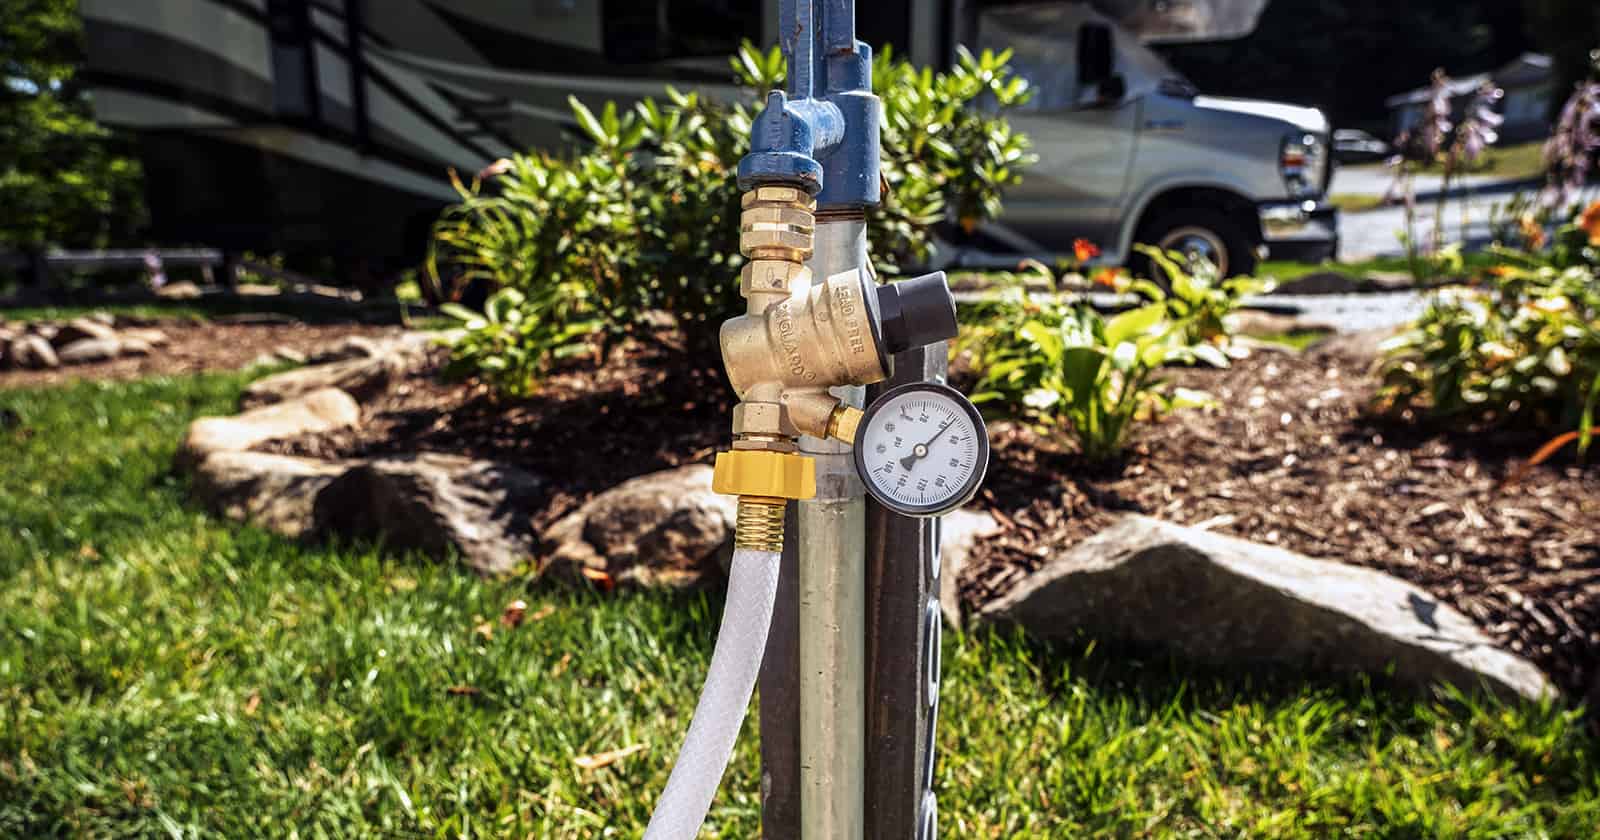
Checking and topping up hydraulic fluid levels
You should clean the cylinders periodically, but always make sure they are dry and well-lubricated after you finish. The lubrication brand will most likely be in the manual. Check the hydraulic fluid. It should be red, so any other color or a severe darkening of the fluid are causes for concern.
Inspecting hydraulic hoses and connections for leaks or wear
Hoses and wiring degrade and absorb damage more often and quickly than metal components. All RV hydraulic leveling systems have hoses and wiring to some degree or another. Get your flashlight ready, even if it’s a sunny day. You’ll spend most of the time in the shade of the RV’s underside, and a good flashlight will provide you with a more detailed visual inspection.
Lubricating moving parts appropriately
This was mentioned above, and it honestly can’t be mentioned enough. Make sure you check the manual or contact the manufacturer to determine the appropriate lubricant. You shouldn’t layer lubricant on top of old lubricant, either. A good wash should come first since old lubricants tend to attract sand and dirt, two archenemies of moving parts. Be sure to wipe down any excess lubricant since too much of anything is always a bad thing.
The importance of using the right hydraulic fluid
That handy manual is mentioned a lot for a good reason. Again, if the hydraulic leveling system is a factory-installed, integral part of the RV, this information will be in the RV manual. If it’s something that was installed later, it will have its own manual. Of course, there is a chance that you purchased your RV used, and the owner didn’t have the original manual.
If this is your situation, you will find an online manual for just about anything ever manufactured on the planet. There are a number of ways to do this, including the following:
- SafeManuals
- Manuals Online
- Internet Archive Manual Library
- ManualsLib
- Any Alternative Search Engine Preference—DuckDuckGo, Presearch, Brave, Bing, Ecosia, StartPage, Yahoo, Etc.
The toughest part will be dealing with systems that have multiple model numbers. Lippert, Power Gear, HWH, Kwikee, RVA, Atwood, Equalizer, and Bigfoot all manufacture leveling systems. If you have a used RV with no manual or don’t know where to find the information, there are a few places to look.
- Hydraulic Leveler Control Panel
- Check for brand stamps, laser etches, or labels on the jacks beneath your RV
- Take pictures of various components and use Google Image Search to locate identical components, matching the brand and model number accordingly
RV hydraulic leveling system maintenance requires a rare top-off or complete replacement of hydraulic fluid. Knowing who the manufacturer is will help you find the right hydraulic fluid for your rig. Putting the wrong hydraulic fluid in your system may have negative results.
Troubleshooting Common Issues
RV hydraulic leveling system maintenance sounds like a complicated issue to maintain, inspect, and fix, at least in a DIY capacity. In reality, there are several things you can do and fix, especially if you are fairly knowledgeable on the topic and familiar with the functionality of hydraulic levelers. However, there are times when you just have to throw in the towel and place it in the hands of a professional.
RV Is Not Leveling Properly
Perhaps the system is working as you expect, but when you check the level, your RV is still slightly off-kilter. This is common enough on rough terrain, high-angle slopes, or over soft earth. This is also where you discover how capable your system is, especially when it comes to managing difficult terrain and compensating for it.
The first course of action is to conduct a visual inspection of your leveling system just to be sure there are no leaks and that your hydraulic fluid is good to go. Then break out the leveling blocks. If you’re on flat, solid ground and this is still happening, it’s a simple matter of identifying which jack is problematic. On uneven or poor ground, readjusting the camper or using leveling blocks will often right the ship.
Also, be sure to check your weight limitations in the owner’s manual. Each jack has a weight limit, and it could be that you are taking advantage of a nice cargo-carrying capacity (CCC), but storing everything unevenly.
Additionally, many systems have a circuit board with a leveling adjustment. This should be in the leveling system manual. Typically, to recalibrate it, you will level the rig manually and then adjust the calibration point according to the manual.
Extending Or Retracting Issues
If your jacks are not extending or retracting properly, your first priority is checking the power. RV hydraulic leveling systems require electric pumps to work. Thoroughly check over your wiring, power source, connections, and fuses.
If all of those things check out, it’s time to look over your hydraulic fluid, checking to ensure that it’s topped off and that the fluid is a bright, clean red.
Drifting
Drifting is exactly what it sounds like. The jacks retract and extend correctly, however, the RV doesn’t remain level because the jacks are not holding their positions. Again, this is potentially a weight issue, which is why it’s important to pack your camper evenly throughout. Outside of weight problems, this usually boils down to a hydraulic leak or air in the system.
If it’s a leak, you should be able to identify it visually. If there are no leaks, you need to break out the manual again and follow the procedure for bleeding the air out of the system. For leaking jacks, most are surprisingly easy to rebuild (the replacement of an O-ring here, or the grommet there). However, some may need much more than that, or the jacks may be welded to the frame.
In some cases, you will find that any place that works on hydraulics can do a rebuild on the seals. However, some companies like HWH are known to use proprietary boring and seal sizes, so you will have to order a rebuilt one or send your current one to them to do the build.
Loud grinding Or Creaking Noises
The manual is your best friend in this scenario. The noise is generally the result of metal-on-metal, with improper lubrication. Break into the manual, find the best lubricant for your system, and apply it. However, make sure you clean the moving parts with soap and water, thoroughly drying them afterward before you apply the lubricant.
Call a Professional
For instances that require a rebuild or when the jacks are welded to the frame, a professional repair is often the only option. That is, unless you are a first-class or master welder, with the right tools and equipment on hand. RV hydraulic leveling system maintenance can reach a detrimental point where it’s simply too complicated for a DIY project.
Professional Maintenance and Service
First and foremost, whether you decide to make it a DIY repair or contact a professional, do not use your hydraulic leveling system if there is something wrong. Not only is it a safety hazard, but an improper level with malfunctioning equipment can damage the RV frame, causing massive financial headaches.
If it’s something you can’t fix, professional servicing is your only alternative, even if that means replacement. For the most part, you don’t have to have your hydraulic system professionally serviced periodically as long as you are doing the preventative maintenance yourself, along with routine inspection checks.
Go over your owner’s manual thoroughly because it will have routine maintenance guidelines for you to follow. The more stringent you are with preventative maintenance and following the guidelines, the less you will have to worry about covering the cost of a professional repair.
Conclusion
RV hydraulic leveling systems are a huge convenience, with enough power to lift and level an immense load (usually a minimum of a ton per jack). But it does come with a price (other than financially). The price you have to pay is time—time spent going over the system, establishing an inspection routine, and engaging in routine, in-depth preventative maintenance.
The good news is that preventative maintenance isn’t the mighty struggle it sounds like. It’s mostly a matter of checking things over, with the occasional topping off of fluids, air-bleeding, fluid replacement, or O-ring/grommet replacement. Regardless, for your health and safety, along with the structural integrity of your RV, it is of paramount importance.