Use the Sun’s Heat and Save on Propane and Power
Solar air heating is an exciting technology for anyone wanting to heat their RV using the sun’s energy. A solar air heater uses free, renewable, and clean energy to produce heat. Solar air heaters absorb thermal energy from direct sunlight, creating heated air. This heated air can then be used to keep the interior of an RV comfortably warm on cold days.
How Does It Work?
A commercial solar air heater is composed of 5 main components. The first is a rectangular box. This box houses tubes that collect solar heat. A plastic panel protects the face of the box. The second part is an air intake vent that draws air from the RV.
An exhaust vent sends heated air from the unit into the RV via a fan powered by small solar panels at the top of the solar air heater. Finally, a thermostat controls the temperature of the warm air entering the RV so it won’t be too hot or too cold.

How Do You Install A Solar Air Heater In An RV?
Most solar heaters are designed for houses or tiny homes and therefore mounted on an exterior wall with holes for the vents cut into it. This usually raises concerns for RVers who like to avoid cutting into RV walls. It is possible to install the unit in one of the RV windows if you can find a commercial one that fits a window. But there lies a problem. There aren’t any good commercial options that would fit an RV. This leaves RVers with the task of building one themselves.
A Simple DIY Solar Heater Project
Solar heaters, as seen in some videos below, can be made of many different types of material. However, some basic building materials you will probably need are:
- Wood to make the frame.
- Sheet of plexiglass cut to the size of the heater you intend to make.
- Black metal screen or soda cans.
- Black spray paint with high heat tolerance.
- A way to mount the box in a window of your RV.
- A 12V solar panel with a 12V fan (optional).
Like any DIY project, there is some creative room to adapt this project to your specific rig and needs. Because there is so much adaptability, rather than giving detailed instructions for one type of RV or mounting location, the instructions below will help guide you in designing your own solar heater that will fit your needs.
1. Design Your Frame
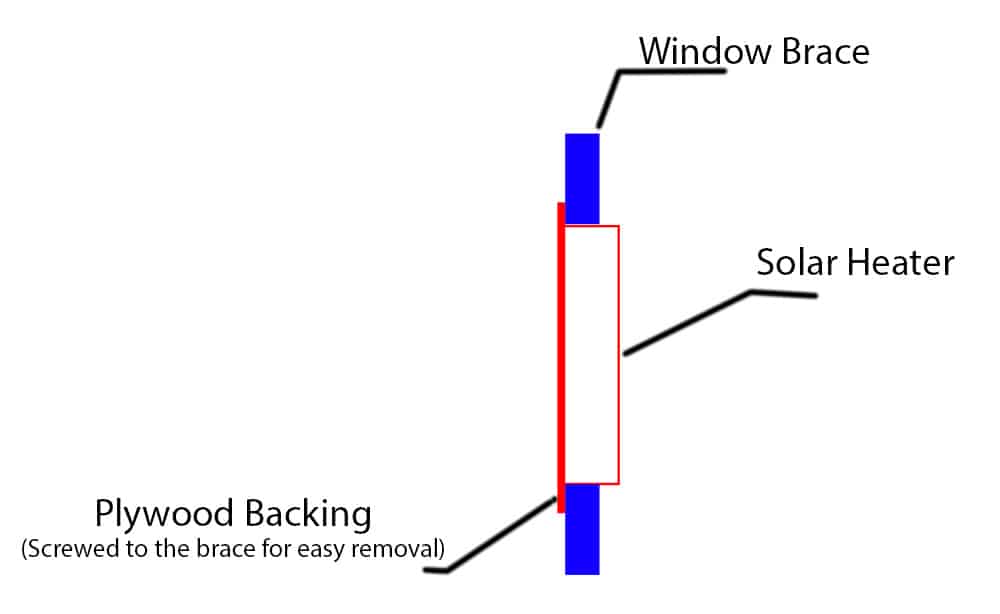
Determining how you will mount the heater in your window is an excellent place to start. The video below shows how to create a removable mounting mod for a window AC unit. This can be easily adapted to make a small solar heater in the center of the frame rather than sticking an AC unit in there.
2. Decide on Your Filler Material
The filler material of a solar heater is generally made of flat black metal. Everything from black window screens rolled into tubes to painted soda cans stacked on top of each other works well. You will want to paint the entire interior of the box black to absorb heat and line it with your chosen filler material.
The video below shows an RVer who used leftover materials from other projects to build a window solar air heater for their rig.
3. Do You Want Active or Passive Heating
The video above shows an example of a passive solar heater. In other words, as the sun heats the air inside the box, it rises up and out the top hole, drawing the cooler air into the bottom hole. This results in warm air slowly moving through the unit. The advantage is that there are no moving parts.
If you want more airflow, you can install a small computer fan in the top hole of the unit. This will actively draw air in through the bottom and across the heating elements. Because the air is being drawn more quickly across the material, this may result in air that isn’t as warm as a passive system, but it will circulate the warm air through your space much more quickly. Below showcases two more versions of solar heaters and adds a fan and a solar panel to create a completely solar-powered unit that has active heating.
Happy Winter Camping
Depending on where you are taking your RV this winter, a solar heater may or may not provide all your heating needs. But every little bit of heat you can add to your rig without burning electricity or propane has the potential to be good for both your pocketbook and the planet. And as easy as making a solar air heater with recycled materials is, it’s a fun project to try. Just make sure the window you install it in gets plenty of sunlight.


You said the nighttime temp was 32 degrees?? And hour internal heater never came on all night? How is heating using the 32 degree outside for the heat?
The authors did not make the video. However, the person in the video mentioned that they made some insulation upgrades. So my guess would be the unit kept the rig toasty enough during the day that with the added insulation, the rig didn’t fall below 70 degrees overnight. It would take a pretty good insulation upgrade to achieve this in my RVing experience. I wouldn’t guarantee that bee the case for all or even most rigs. It’s definitely a daytime heating mod.
Thanks for being a Camper Smarts Reader.
Little bit left out. This idea has been used for many, many, years, definitely nothing new. And it works. Supposedly the best use is with empthy soda cans. However, saw nothing mentioned about the fact that it is a bit better if at an angle – making it long enough to the bottom can rest on the ground, at an angle is a good idea. However, nothing is mentioned of the fact that leave it on overnight, and you are likely to get cold air all night. Simple solution tho, either unhook it for overnight, or block the openings. Personally, the way things are today I would just unhook it and move it inside overnight, guaranteeing you would still have it in the morning. Long is better than short, and no mention of the fact that you can put up more than one. Oh yeah, you don’t NEED plexiglass, thich sheet plastic will work as well, at a lower cost.
Thanks for the info and for being a Camper Smarts reader. All very good points.
“Oh yeah, you don’t NEED plexiglass, thich [sic] sheet plastic will work as well, at a lower cost.” And probably at a lower weight penalty.